

Elevating professional microscopy work with Sony system cameras: The Sony Imaging Edge software streamlines and optimises workflows in Live View mode

With our LM digital adapter solutions, powerful Sony cameras can be tethered to the microscope for creating high-quality remote images.

Operating the camera via a PC or Mac is very convenient and ergonomic, especially when the camera is mounted high up on the microscope’s phototube. With the appropriate software, large image files can also be effortlessly saved to the computer’s hard drive.
Sony’s Imaging Edge software can be used over a wired (USB) or a wireless (Wi-Fi/LAN) connection. We recommend a wired connection for secure, high-speed data transfer. The software is a combination of three photography applications: “Remote”, “Viewer”, and “Edit“. It can be downloaded for free from the Sony website.

We used version 3.6.00.01200 of the software. Other versions may be slightly different.

The remote window has three sections: the menu tabs on the top left (A), the Live View screen (B) and the operation panel (C).

The Live View screen (B) shows the current view of the camera. The operation panel (C) provides basic shooting settings such as exposure and image quality. The settings are applied to the camera immediately.
Below is a brief overview of the menu tabs:
In the “File” menu tab, the destination folder for shot images can be selected and the other two components of the software suite – “Viewer” and “Edit” – can be launched. The command to quit the program is also located in the “File” tab.

The settings for the software and the camera can be adjusted in “Tools” and “Camera Settings”:

In the “Camera Settings” tab, users can configure the storage destination, size and format of captured images.

In addition to the menu tabs, most settings can also be adjusted from the operation panel (C) and by using the buttons on top of the Live View screen.

Using the focus magnifier is very useful when working on the microscope. Especially at resolutions as high as those offered by the new Sony Alpha system cameras, even the smallest misfocus can have a dramatic impact. For this reason, it is recommended to use the software’s focus magnifier for precise image focusing.
Shown in the image: our demo photo – a coin at magnifications of 7x and 9.3x


The different magnification options are located on top of the Live View screen:

Here, the live image can be rotated and gridlines can be placed over the image displayed in the window. The overlay function allows other objects, such as a ruler or other scale marks, to be placed over the image.
Operation panel overview
The operation panel is arranged into a number of groups:
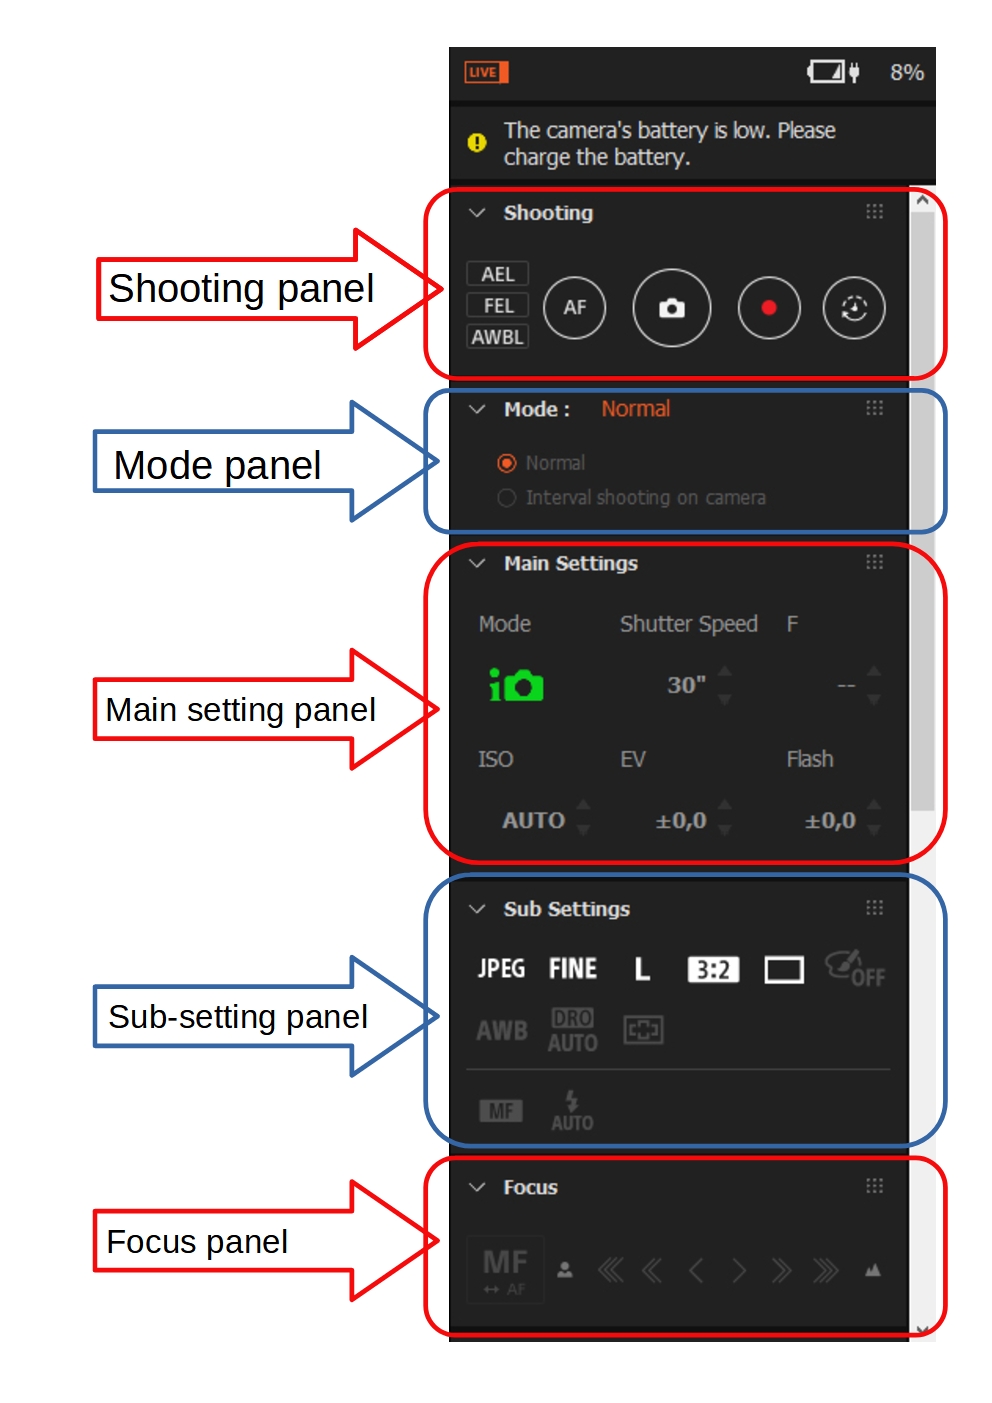
1.) Shooting panel
The functions contained in this panel include the button for releasing the shutter and the movie button. The autofocus (AF) function is not really relevant when taking pictures through the microscope because the microscope’s coarse and fine focus controls are used for focusing the image.
2.) Mode panel
Here, different shooting modes can be selected, for example interval shooting. We recommend setting an interval of one or two seconds after each shot to avoid motion blur. This is particularly important when working with a mechanical shutter, as its operation causes a slight vibration across the entire camera-adapter-microscope assembly. For this reason, using the electronic shutter, if available, is highly advisable.
For cameras that already support this technology (such as the Sony Alpha 7R V), there is also the option of using the “Pixel Shift Multi Shot” feature for stationary subjects. With this feature, the camera takes a series of 4 or 16 uncompressed RAW images, slightly shifting the sensor by one pixel each. The goal is to achieve even better image quality through higher colour resolution, less noise and more dynamic range.
![]()
![]()
3.) Main setting panel
The main setting panel contains the following settings:
• Shooting mode
• Shutter speed
• Aperture value
• ISO sensitivity
• Exposure compensation
• Flash compensation
4.) Sub-setting panel
This panel contains the settings that are particularly important for photomicrography:
• Format of the image to be saved (JPG, RAW, RAW-J,…), image quality, image size
• Aspect ratio
• Single shooting/continuous shooting/timer settings
• Picture effects
• White balancing
White balancing is particularly important for our area of application. Various options are available – either using the “AWB” button in this panel or adjusting the white balance in the “Camera Settings”/“White Balance” menu tab.


Use the eyedropper symbol to define an area of the image as “white”. The software then adjusts the colour balance of the entire image based on that selection.
In the Imaging Edge Viewer, saved images can be opened, viewed and edited in the “Edit” window.

An overview of the supported cameras is available on the following Sony website: https://support.d-imaging.sony.co.jp/app/imagingedge/en/devices/
21.05.2024Photography:
Fitting the microscope to digital single-lens reflex (DSLR), mirrorless interchangeable-lens cameras (MILC ), digital single-lens mirrorless (DSLM) or C-mount cameras is easy with our LM digital SLR adapters, which feature a plan achromatic optical system. Our products make it possible to capture top-quality microscope images. To help you select the adapter that is right for your camera, we have set up an online configurator on our website. You can also email us – ideally with attached photographs of your microscope.
Modern DSLR and single-lens mirrorless (DSLM) offer the latest technology and are generally very well suited for microscopy applications. Most of them can be controlled remotely via PC/Mac. Because of their high sales volumes, they offer an excellent price/performance ratio compared to special-purpose microscope cameras.
Features of top DSLR and single-lens mirrorless cameras (DSLM):
- Large, powerful full-frame sensors (36 x 24 mm)
- Sensor resolution of 61 megapixels or 240 megapixels with Pixel Shift technology
- High light sensitivity (ISO 400,000+)
- Extensive dynamic range (up to 15 aperture stops/f-stops)
- Short exposure times (1/8000 second) up to 1/32,000 seconds using the digital shutter
- 4K Ultra HD or 8K Ultra HD video function
- Live video capture on external monitors in ultra HD quality
In most cases, these cameras are significantly more powerful than microscope cameras with smaller sensors (1/2" or 2/3"). On our website you will find our current camera recommendations and a camera ranking which is specifically tailored to microscopy applications.